Skip to content

Rebdev, LLC

A Better Way Forward

  • Blog
  • Solutions
    • Add-ons
    • Custom Development
    • Integrations
  • Consulting
    • Optimization Review
    • Sage X3 Consulting
    • Project Management
  • Endorsements
  • Careers
  • Contact
Rebdev, LLC

Tag: account

Year-End: Year-end Simulation

X3 offers two choices for closing a year: Year End Simulation, which creates opening balances without formally closing the previous year, and Fiscal Year Closing, which formally closes a fiscal year. In this post we’re going to walk through a year-end simulation.

A year end simulation is similar to closing a fiscal year in that it calculates the closing balances of a given fiscal year, which then become the opening balances of the next. The difference is that a year end simulation does not create journal entries, and it does not close the year. Because of this, year end simulation is useful for confirming that closing balances are correct, it and can also be used to open a new fiscal year without closing the previous.

To perform a year end simulation, navigate to Financials > Utilities > Closing > Year end simulation

By default, the simulation will run for the current year(It assumes you are running this function in the year you need to calculate opening balances) and for all companies. If you don’t wish to run this for all companies, uncheck the ‘All companies’ box and define a company in the ‘Company’ field. You will also have to define the fiscal year in the ‘Fiscal year’ field.

Click OK to run the simulation!

When the simulation is complete, X3 will have populated the opening balances and generated a log file. The log file may contain errors that need addressed and will detail the balance of each account which can be used to confirm it’s correct.

If corrections need to me made they can since the year has not been formally closed. The simulation can be run as many times as needed.

Check back next time when we’ll walk through closing a fiscal year!

Author adminPosted on May 24, 2021Categories How-tos, year-endTags account, balances, closing, financials, month end, sagepartners, sagex3, simulation, X3, year end

What’s New in SEI V9: Finance UDM Pt. 2

In the last blog, we looked at how to set up account mapping. Today we’ll take a look at how to create report blueprints. Report blueprints are important because they are they foundation to your financial reports. Here is where we will define account groupings and account signs(+/-). For each financial report, a blueprint will need to be defined.

Let’s take a step back however and revisit the account mapping. We’ve saved our data from the report, but there is one more step to take. We have to publish the data to make it accessible for use in your financial reports.

Think of it like publishing a novel. You work and make progress, saving the ‘data’. When your novel is complete and you are ready to share it with the world, you go and publish the finished version. This is the same in SEI.

So to publish our account mappings, navigate to Universal Data Model > Finance > Configuration > Report Account Mapping

Report Account Mapping Process

Right click on this process to view it’s options. Find ‘View Info Pages’.

View Process Info Pages

There are a few options on this page. We will be concerned with the section labeled ‘Publish Account Grouping’.

Here you will enter your chart of accounts for which you wish to publish the mappings.

Enter chart of accounts code

Next, to publish the mappings, click either ‘Update (SQL Server Only)’ or ‘Update(ORACLE Only) depending on your database. Look for the success message in the bottom of your screen.

If the publishing step is successful, you are ready to refresh the associated cube! To do this step, you must have administrator access. Navigate to the admin menu by clicking the wrench icon in the top right.

Now find ‘OLAP Manager’ and click to open.

In the search bar in the top right, type ‘accounts’ and find THE ‘UDM Accounts’ cube.

From the menu on the right, choose the tools icon.

On this menu, keep the action as ‘Build, choose the environment, then check the ‘UDM Accounts’ cube from the list. Click Confirm.

When this process is complete (Check the ‘Last Build Structure Date’) Complete the previous step again but instead of the action ‘Build’, choose ‘Load All’.

When this step is complete (Check the ‘Last Job Run Date’ and ‘Status’ Columns) you are ready to begin the report blueprint! Check back for a walkthrough on how to complete this step next time.

Author adminPosted on November 13, 2020Categories How-tos, SEI V9Tags account, balancesheet, blueprint, build, finance, incomestatement, report, Sage, Sage Enterprise Intelligence, Sage X3, sagepartners, sagex3, universal data model

What’s New in SEI V9- Finance UDM Pt. 1

The UDM is a powerful feature that allows a user to create consolidated reports that use multiple data sources. This means, you can create a comprehensive report with details from sales, inventory, CRM, etc!

In a previous blog(Financials on the Web), I showed you what was possible to create using the UDM. In this post, and the following, I will break down the steps to create your financials on the web.

While there are various out of the box reports, it is advantageous to configure the cube to what you need and create your own reports.

Out-of-the-box reports

Start by mapping your accounts. Navigate to the Universal Data Model folder > Finance > Configuration > Report Account Mapping > Account Setup

Account Setup

Double click to open this view and begin mapping your accounts. Default accounts have been defined but you may define your own. Start by entering the group/account name, i.e., WIP_Inv. Then enter in the account description, i.e. WIP Inventory, and the account numbers associated. If there are accounts to be excluded, those can be defined as well

Account Mapping

When defining accounts, here are a few ways to list them. If you want to include every account that begins with a ‘2’, type 2*

If you’d like to define a range of accounts, type the beginning account and ending account to include, separated by a ‘:’

You can also simply define each account number separated by a comma

These rules also apply for accounts to exclude.

As you are making changes, be sure to save your work! Under worksheet properties, auto save can be toggled on so that changes are saved to the view as they are made.

Activate Auto Save

Otherwise, changes will appear highlighted in green and you must manually save the view.

Unsaved Change

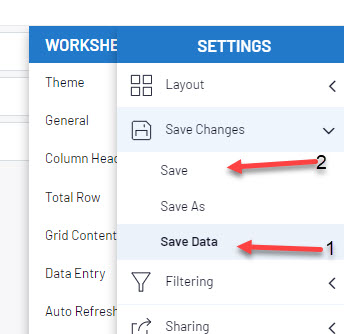
If manually saving, two steps must be taken. The first is ‘Save Data’ then ‘Save’. If ‘Save Data’ is not first clicked, your data entered will not be saved.

Defining your account set up is the first step to take in utilizing the Finance UDM, whether you are going to use the standard reports, or create your own.

Check back to see the next step!

Author adminPosted on October 26, 2020Categories How-tos, SEI V9Tags account, development, finance, rebdev, Sage, Sage Enterprise Intelligence, Sage X3, sagepartners, sagex3, SEI, seiv9, udm, universal data model
  • Blog
  • Solutions
    • Add-ons
    • Custom Development
    • Integrations
  • Consulting
    • Optimization Review
    • Sage X3 Consulting
    • Project Management
  • Endorsements
  • Careers
  • Contact
Rebdev, LLC Proudly powered by WordPress