Month End- Checks & Validations Pt. 3

Today we’ll look at 3 more ways to verify that all entries have been posted.
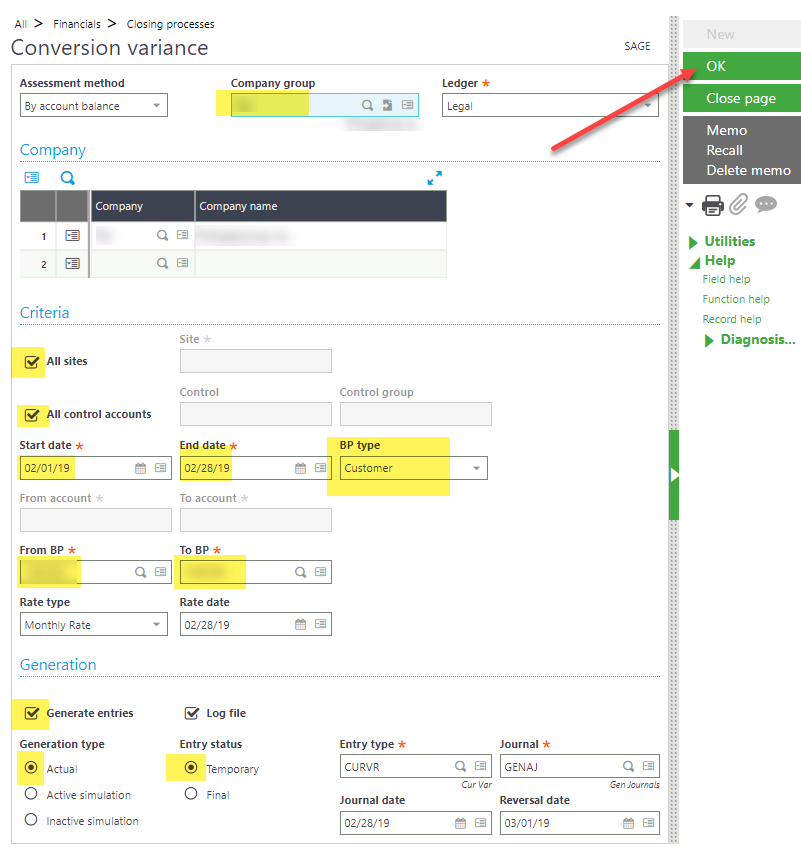
  1. Conversion Variance
    • This function creates entries to offset variances due to exchange rates so that accounts will balance
      1. Navigate to Financials > Closing processes > Conversion variance (ACCCURCNV)
      2. Choose the Company group for which to preform the conversion
      3. Check ‘All Sites’
      4. Check ‘All Control Accounts’ or define the accounts
      5. Set the date range for the fiscal period
      6. Choose one BP or a range
      7. Ensure ‘Generate entries’ is marked, generation type is ‘Actual’ and Entry status is ‘Temporary’
      8. This function is most commonly run for BP type Customer and BP type Supplier
      9. Click OK
  2. Stock Accounting Interface
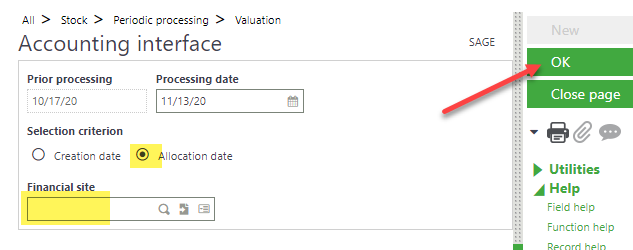
    • Use this function to create entries for stock movements/transactions and update values of stock. When sales deliveries, purchase receipts, stock movements and similar transactions are created, the GL is not updated until this function is run.
      1. Navigate to Stock > Periodic processing >Account Interface (FUNSTKACC)
      2. Selection Criteria should be set to ‘Allocation Date’
      3. Financial site can be left blank to run this for all companies
      4. Click OK
  3. Stock Valuation Report
    • Run this report to use a check to confirm stock values are what you are expecting
      1. Navigate to Stock > Periodic processing > Stock valuation report (FUNSTVA)
      2. Choose the Company to run the report for
      3. You may define other parameters but it is not necessary
      4. Click OK. This will bring you to a screen from which you can print the report

Tune in next time to read about the final step in validating and checking for month end closing!

How to Change the Expiration Date Reference in the Lot Mass Change Function

When entering an expiration date in the Lot Mass Change function or Characteristics change function, the year might default to 19xx. For example, you might set the date to 3/1/30 but the date then defaults to 3/1/1930 when you meant 2030. This causes your lot to be expired and unusable!

To resolve this, navigate to Administration> Administration> Global Settings

Click “Edit” on the right hand panel

Change the upper bound of two digit year expansion interval field to your desired year

Click “Save” on the right hand panel.

Now when 3/1/30 is entered, the date will display as 3/1/2030

How to create a browser object with filter criteria

Sometimes the left list in a function can be a bit overwhelming when it contains every record. Did you know it’s possible to created another left list that contains only the data you need? Below are the steps to create a browser object with filter criteria. By following these steps a ‘drawer’ or ‘tab’ on the left list will be created making it quicker and more simple to find the records you need to see.

Navigate to Development > Script Dictionary > Objects

Click ‘New’ to start a new record

Give your object an identifying code & a description. Use the selection icon to choose a linked table

On the General tab, give your object an activity code and choose ‘Browser’ as the management type.

Also on the General tab, make sure your standard & specific script names populate. You will need the specific script name later.

Usually on an object you pick, from the linked table, which fields to display, as below. The SOH object, for example, in the selection screen block, you would define an index (SOH0) then specify a table and field from that table to display. For our browser object, we will do this in the specific script.

Click the ‘Create’ button to create your object.

Create your specific script and add the following piece of code to the Action label:

When "CLE_GAUCHE" : Gosub CLE_GAUCHE  

This action is called before loading the left list

Next, create the action label block:

$CLE_GAUCHE 
return

This is where you will define the filter criteria for your left list drawer by using the variable ‘FILTSUP’. The filter criteria is expressed in a string with logic to combine criteria. See below for an example.

FILTSUP = 'SOHCAT = 4'

This will filter the left list for sale orders that are categorized as contract types. If you need a more complex filter see how to add more criteria below.

FILTSUP = '(SOHCAT = 4 OR SOHCAT = 3) AND CPY = 111'

This would filter the left list for sale orders categorized as contracts or direct invoice and also looking for the company to be ‘111’.

 ###########################################

$ACTION

Case ACTION

         When “CLE_GAUCHE : Gosub CLE_GAUCHE

Endcase

###########################################

$CLE_GAUCHE

FILTSUP=FILTSUP = '(SOHCAT = 4 OR SOHCAT = 3) AND CPY = 111'

Return

###########################################

How to eliminate the ENDDAT parameter error

Going into the new year, you may encounter this error message:

This is because ENDDAT parameter value needs to be updated to reflect the new year.  This HTG will show you how to get rid of that warning.

Open Setup-General parameters-Parameter values

On the Parameter values left list, expand SUP Supervisor, then Folder and select your folder (usually the only folder option you will have is the one you’re logged into).

On the main screen, find DEF (Default values), click its action card and click Details.


Now we’ve finally reached the parameter that’s causing that warning to appear: the ENDDAT parameter.  It will be 12/31 of the year that just ended.  You will need to change the year to the year we’re currently on (keep the 12/31 part).  For example, if 2019 just passed and we’re now on 2020, you need to change the ENDDAT value from 12/31/2019 to 12/31/2020.  Click OK when done.

Make sure you click Save on the main screen after clicking OK. Otherwise the change won’t actually stick.

You will have to log out of Sage X3 and back in before this take effect.